Here are 2 DIY patterns to make two kinds of cloth face masks with an interior pocket in which you can insert additional filter material, and elastic ear loops.
Materials
- cotton fabric, tightly woven
- 1/8″ elastic, or fabric ties
Tools
- sewing machine and thread
- scissors
- ruler
- sewing pins or clips
Instructions
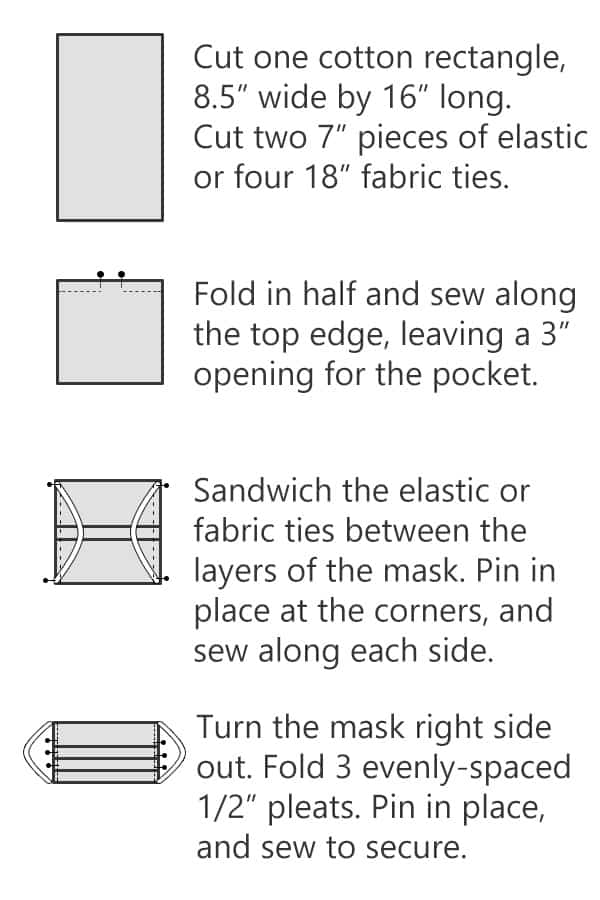
- Cut the fabric. For an adult size mask, cut 1 fabric rectangle 16″ long and 8.5″ wide. Cut 2 pieces of elastic, each 7″ long. Or, cut 4 fabric ties 18″ long.
For a child-size mask, cut 1 fabric rectangle 14″ long and 6.5″ wide. Then, cut 2 pieces of elastic, each 6″ long. - Sew the top side, with pocket opening. Fold the fabric in half, with the right sides facing.
Sew along the 8.5″ width edge, using a 5/8″ seam allowance. Leave a 3” opening in the center of this seam to create an opening for the filter pocket, and to allow the mask to be turned right side out after sewing.
Press the seam open. Topstitch/zig-zag stitch along both sides of the seam for a neater edge. - Pin Elastic or Fabric Ties. Pin one piece of elastic to each side of the mask, one end to the top corner and one end to the bottom corner. If using fabric ties, pin one tie to each corner, with the rest of the tie sandwiched inside the two layers of fabric.
- Sew the Sides. Sew the sides of the facemask. Backstitch over the elastic or fabric ties to secure them.
Clip the corners, turn the mask right side out, and press with an iron. - Sew the Pleats
Create three evenly spaced 1/2” pleats. Pin the folds in place, making sure all pleats are facing the same direction. Sew down each side to secure the pleats.
Note: When the mask is worn, the pleats should open downwards to prevent any particles from collecting in the fold pockets.

Let us know if you made these face masks at home?


